Instructions for verifying the validity of an electronic signature
Firefox version 35
- Start Mozilla Firefox. In the address bar type the following URL: http://www.ca.posta.rs/ca-sertifikati/PostaCARoot.der
- The browser will ask whether you want to open or save the file. Click Save.
- In Firefox, go to Tools/Options and select Advanced, after that go to tab Encryption.
- In Encryption tab click on button View Certificates and new window will appear in which you need to go to tab Authorities and click on Import.
- Next step is loading the file which you saved in step 2 (PostaCARoot.der), so find the file on your computer, clik on it and then hit Open.
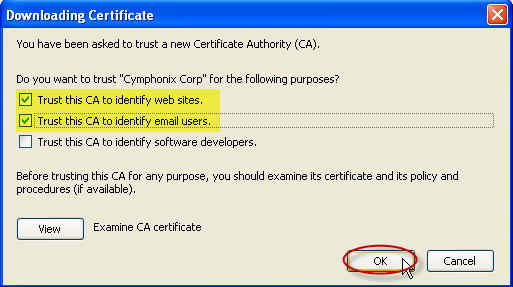
- In the window that appear, check first two options: Trust this CA to identify web sites i Trust this CA to identify mail users, hit OK button.
- In the end, click OK on Options window and restart Firefox.
You have successfully installed the certificate. Move on to configuring Adobe Reader.
Configuring Adobe Reader
- Right click on the signed signature field, select "Validate Signature".

- Click "Signature Properties" button.
- Select the "signer" tab.
- Click "Show Certificate" button.
- Select the "Trust" tab.
- Click the "Add to Trusted Identities" button and OK.
- Set the desired "trust" settings, check box for Use this certificate as a trusted root and Signed documents or data if its not already checked.
- Click OK twice and Close.
- Right click on the signed signature field.
- Select "Validate Signature" - you should now get the green check mark.

Firefox vesion 36.0.4 and on
- Start Mozilla Firefox. In the address bar type the following URL: http://www.ca.posta.rs/ca-sertifikati/PostaCARoot.der
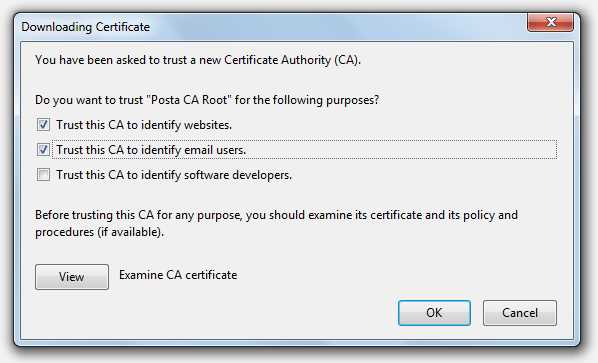
- The browser will open a window in which you need to check first two options Trust this CA to identify websites i Trust this CA to identify email users and hit OK:
You have successfully installed the certificate. Move on to configuring Adobe Reader.
Configuring Adobe Readera
- Right click on the signed signature field, select "Validate Signature".
- Click "Signature Properties" button.
- Select the "signer" tab.
- Click "Show Certificate" button.
- Select the "Trust" tab.
- Click the "Add to Trusted Identities" button and OK.
- Set the desired "trust" settings, check box for Use this certificate as a trusted root and Signed documents or data if its not already checked.
- Click OK twice and Close.
- Right click on the signed signature field.
- Select "Validate Signature" - you should now get the green check mark.
Chrome version 41.0
- Start Google Chrome. In the address bar type the following URL: http://www.ca.posta.rs/ca-sertifikati/PostaCARoot.der
- The browser will save the file automatically. Click Open.

- A window for installing the certificate will appear. Click on Install Certificate.
- A window for installing the certificate will appear. Click on Next.
- Now choose a location where the certificate will be installed. If you have a 32-bit operating system (check here) choose the option "Automatically select the certificate store based on type of certificate", and if you have a 64-bit operating system (check here) choose the option "Place all certificates in the following store", click on the Browse<.strong> button and choose the option "Trusted Root Certification Authorities". Confirm by clicking OK.
- The setup will inform you that the installation was successful. Click Finish, then OK, and finally once more on OK, then you should see the message:

You have successfully installed the certificate. Move on to configuring Adobe Reader.
Configuring Adobe Reader
First check your version of Adobe reader by starting it and choosing Help > About > Adobe Reader. Here you will see X if it's version ten or XI if it's version eleven.
If you don't have Adobe Reader installed, you can download it by following the link: http://get.adobe.com/reader/. If you are running Adobe Reader for the first time, you need to accept the license. The version currently available for download is 11.0.09.
Now you need to configure Adobe Reader to use the Windows certificate database:
To configure Adobe Reader (version 10):
- From the Edit menu click the option Preferences.
- Choose the Security category (from the vertical menu on the left).
- Click on Advanced Preferences.
- Choose the Windows Integration tab.
- Tick the following:
- Enable import and use of identities from Windows Certificate Store
- Validating Signatures
- Validating Certified Documents
- Click twice on OK to leave the configuration window.
To configure Adobe Reader (version 11):
- From the Edit menu choose the option Preferences.
- Choose the category Signatures (from the vertical menu on the left).
- Click More under Verification.
- In the Windows Integration field, tick the following:
- Validating Signatures
- Validating Certified Documents
- Then click on OK and again on OK.
If you successfully installed everything, then the following message should appear in the upper left hand corner the next time you open an electronically signed document:
An electronic signature should appear on the lower right hand corner, detailing the name of the person who signed the invoice as well as information about our company and the invoice signing date.
Internet Explorer version 11
- Start Internet Explorer. In the address bar type the following URL: http://www.ca.posta.rs/ca-sertifikati/PostaCARoot.der
- The browser will ask whether you want to open or save the file. Click Open.
- A window for installing the certificate will appear. Click on Install Certificate.
- The first setup window will appear. Click Next.
- Now choose a location where the certificate will be installed. If you have a 32-bit operating system (check here) choose the option "Automatically select the certificate store based on type of certificate", and if you have a 64-bit operating system (check here) choose the option "Place all certificates in the following store", click on the Browse<.strong> button and choose the option "Trusted Root Certification Authorities". Confirm by clicking OK.
- The setup will inform you that the installation was successful. Click Finish, then OK, and finally once more on OK.
You have successfully installed the certificate. Move on to configuring Adobe Reader.
Configuring Adobe Reader
First check your version of Adobe reader by starting it and choosing Help > About > Adobe Reader. Here you will see X if it's version ten or XI if it's version eleven.
If you don't have Adobe Reader installed, you can download it by following the link: http://get.adobe.com/reader/. If you are running Adobe Reader for the first time, you need to accept the license. The version currently available for download is 11.0.09.
Now you need to configure Adobe Reader to use the Windows certificate database:
To configure Adobe Reader (version 10):
- From the Edit menu click the option Preferences.
- Choose the Security category (from the vertical menu on the left).
- Click on Advanced Preferences.
- Choose the Windows Integration tab.
- Tick the following:
- Enable import and use of identities from Windows Certificate Store
- Validating Signatures
- Validating Certified Documents
- Click twice on OK to leave the configuration window.
To configure Adobe Reader (version 11):
- From the Edit menu choose the option Preferences.
- Choose the category Signatures (from the vertical menu on the left).
- Click More under Verification.
- In the Windows Integration field, tick the following:
- Validating Signatures
- Validating Certified Documents
- Then click on OK and again on OK.
If you successfully installed everything, then the following message should appear in the upper left hand corner the next time you open an electronically signed document:
An electronic signature should appear on the lower right hand corner, detailing the name of the person who signed the invoice as well as information about our company and the invoice signing date.
